9.1 Setting Interface
This section describes how to set the interface.
The plotter has USB, Wireless LAN and Wired LAN* interfaces, and these interfaces are switched automatically.
If the cutting/plotting data is sent from multiple interfaces, the plotter will start cutting/plotting from the first data it receives.
To use the interfaces on this plotter, you need to install the driver software on the PC.
* Wired LAN support varies depending on the sales area.
USB interface
To use the USB interface, the driver software must be installed in the computer. Please the SETUP MANUAL to install the driver software.

• Operation cannot be guaranteed in the following cases:
– When the plotter is connected to a USB hub or extension port.
– When the plotter is connected to a hand-built or modified computer.
– When using a driver other than the one specifically designed for CE8000.
• Notes when using the USB 3.0 interface
– Because that some computer equipped with a USB 3.0 interface is not compatible with USB 2.0 or later interface, you need to check it.
• Do not perform the followings:
– Do not connect or disconnect the USB cable while installing the USB driver on the computer.
– Do not connect or disconnect the USB cable when the computer or the plotter is performing an initialization routine. Do not disconnect the USB cable within a 5-second period of connecting it.
– Do not disconnect the cable during data transfer.
• Please use a USB 2.0 (Hi-Speed) compatible USB cable with a length of less than 3 m.
Wireless LAN, Wired LAN interfaces
To use a wireless LAN or wired LAN interface, you need to set up your computer and have an environment that allows you to connect the computer to a network. Also, temporarily turn off the firewall function or change its settings.
If you turn off the firewall function, disconnect your network from the Internet.
• To connect through a LAN, you need a network cable and a network hub and a wireless LAN router. Please purchase them separately.
• Network configuration depends on your environment. For details, please see the equipment manual, or consult the manufacturer or network administrator.
• Ethernet is compliant with 10BASE-T/100BASE-TX. Please check your network environment.
• Wireless LAN standard supports 802.11 b/g/n (2.4 GHz). It does not support 5GHz bands such as 802.11a.
9.2 Connecting via wireless LAN
Configure settings when connecting using wireless LAN.
* If the wireless LAN module is not installed, [ ] will be displayed on the menu and you will not be able to open the setting items.
When connecting via wireless LAN, set the following items.
• Access point setting
• Entering the IP address
• Entering the subnet mask
• Gateway input
• DHCP setting
Access point setting
Access point settings depend on the network device configuration and your environment.
For details, please see your device's manual or consult your network administrator.
Operation
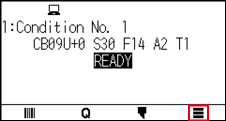
1. Press the [ ] icon.
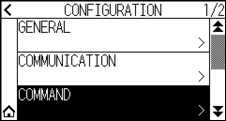
2. Press the [CONFIG].
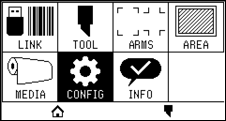
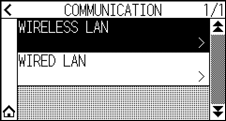
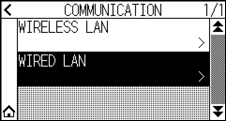
3. Press the [COMMUNICATION].

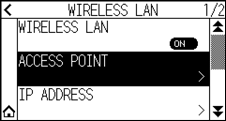
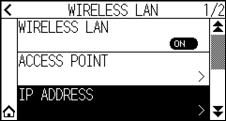
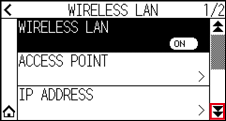
4. Press the [WIRELESS LAN] icon.
5. Press [WIRELESS LAN] to turn it to [ON].
To cancel, set it to [OFF].
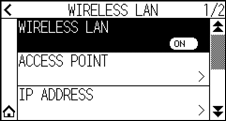
6. Press the [ACCESS POINT].

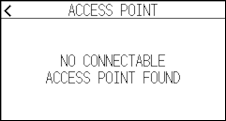
If no connectable access point is found, the following screen will be displayed.
Please check the status of your wireless LAN router.
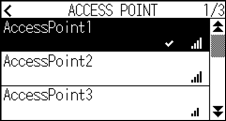
7. Use the [ ] and [
 ] icons to display the access point to be used.
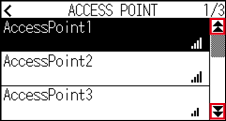
If the access point you want to connect is not displayed, press [ ] to return to the previous screen, then press [ACCESS POINT] again to update the access point.
8. Press the access point you want to use.
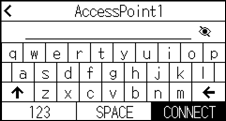
9. Enter the encryption key for the access point you want to use.
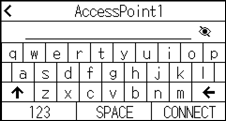
• Press the [  ] button to switch between uppercase and lowercase letters.
• By pressing the [123] button, you can switch the character type in the order of alphabets, numbers, symbols and Hex.
• If you enter one or more letters, numbers or symbols, you cannot switch to Hex.
• If you enter one or more characters in Hex, you cannot switch to alphabets, numbers or symbols.
• When entering in hex, the number of characters must be an even number.
• Press the [ ] button to show or hide (*) the encryption key string.
• Encryption key is saved for the last two access points you connected to.
10. Confirm the entered information and press the [CONNECT].
If an error message is displayed, check the contents of the error message and reconfigure settings again.
11. Press the [YES].
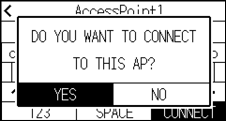
If the acceWhen connected to an access point, a check mark will be displayed to the right of the access point name.
12. Press the [ ] icon.
13. Press the [ ] icon.
 It will return to HOME screen.
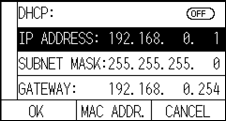
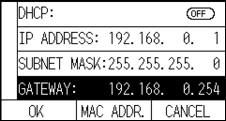
Set IP address, subnet mask and gateway
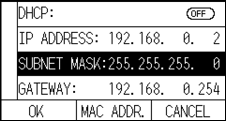
When [OFF] is selected in DHCP setting, set these items.
When [ON] is selected in the DHCP setting, the IP address, subnet mask and gateway obtained from the DHCP server are displayed.
Operation
1. Press the [] icon.
2. Press the [CONFIG].
3. Press the [COMMUNICATION].
4. Press the [WIRELESS LAN]
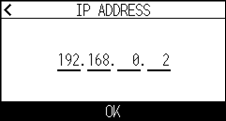
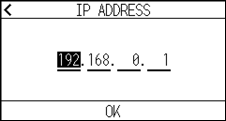
5. Press the [IP ADDRESS].
6. Press the [IP ADDRESS].

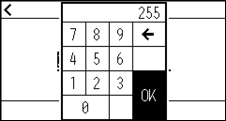
7. Press the separated numbers you want to set.

8. Enter the numbers you want to set and press the [OK].
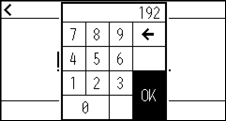
9. Confirm the numbers and press the [OK].
• If you want to change the numbers for other separated numbers, repeat steps 7 and 8.
• If the IP address is the same as the wired LAN IP address, an error screen will be displayed.
Enter a different IP address from the wired LAN.
10. Press the [SUBNET MASK].
11. Press the separated numbers you want to set.
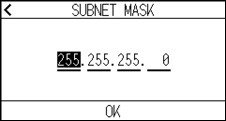
12. Enter the numbers you want to set and press the [OK].
13. Confirm the numbers and press the [OK].

If you want to change the numbers for other separated numbers, repeat steps 11 and 12.
14. Press the [GATEWAY].

15. Press the separated numbers you want to set.
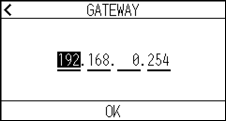
16. Enter the numbers you want to set and press the [OK].
17. Confirm the numbers and press the [OK].
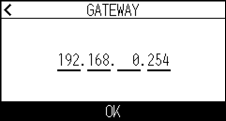
If you want to change the numbers for other separated numbers, repeat steps 15 and 16.
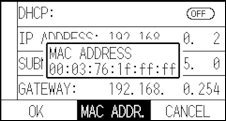
18. Press the [OK].
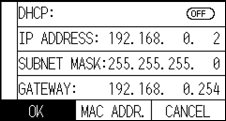
• If you change the settings, the plotter will automatically restart and return to the HOME screen.
• If you didn’t change any settings, proceed to step 19.
• Press the [MAC ADDR.] button to display the MAC address.
19. Press the [] icon.
It will return to HOME screen.
DHCP setting
DHCP settings depends on the network device configuration and your environment.
For details, see your device’s manual or consult your network administrator.
The default value of DHCP is [OFF].
Although the DHCP depends on the settings of the DHCP server, if the DHCP setting is turned on, the IP address of this plotter may change every time the power is turned on.
Changing the IP address may cause problems such as not being able to receive data from the computer.
In order to avoid such problems, we recommend that you turn off the DHCP settings.
Operation
1. Press the [] icon.
2. Press the [CONFIG].
3. Press the [COMMUNICATION].
4. Press the [WIRELESS LAN].
5. Press the [IP ADDRESS].
6. Press [DHCP] to turn it to [ON].
To cancel, set it to [OFF].
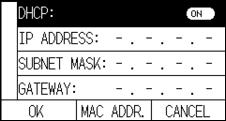
7. Press the [OK].
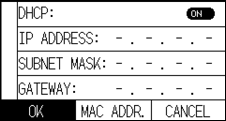
• If you change the settings, the plotter will automatically restart and return to the HOME screen.
• If you do not change any settings, proceed to step 8.
8. Press the [] icon.
It will return to HOME screen.
Confirming the connection information
The SSID and encryption standard, etc. related to the connected access point are displayed.
Operation
1. Press the [] icon.
2. Press the [CONFIG].
3. Press the [COMMUNICATION].
4. Press the [WIRELESS LAN].
5. Press the [] icon.
6. Press the [CONNECTION INFO].
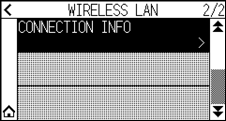
7. Information about the connection is displayed.

8. Press the [] icon.
9. Press the [] icon.
It will return to HOME screen.
9.3 Connecting via wired LAN
This section explains the settings when connecting via wired LAN.
* Wired LAN support varies depending on the sales area.
* If the wired LAN module is not installed, [---] will be displayed on the menu and you will not be able to open the setting items.
When connecting via wired LAN, set the following items.
• Entering the IP address
• Entering the subnet mask
• Entering the gateway
• DHCP setting
IP address, subnet mask and gateway settings
Set the IP address when selecting the [OFF] in the DHCP setting.
If you select the [ON] in the DHCP setting, the IP address, subnet mask and gateway obtained from the DHCP server will be displayed.
Operation
1. Press the [] icon.
2. Press the [CONFIG].
3. Press the [COMMUNICATION].
4. Press the [WIRED LAN].
5. Press the [IP ADDRESS].
6. Press the separated numbers you want to set.
7. Enter the numbers you want to set and press the [OK].
8. Confirm the numbers and press the [OK].

• If you want to change the numbers for other separated numbers, repeat steps 6 and 7.
• If the IP address is the same as the wireless LAN IP address, an error screen will be displayed.
Enter a different IP address from the wireless LAN.
9. Press the [SUBNET MASK].

10. Press the separated numbers you want to set.
11. Enter the numbers you want to set and press the [OK].
12. Confirm the numbers and press the [OK].
If you want to change the numbers for other separated numbers, repeat steps 10 and 11.
13. Press the [GATEWAY].
14. Press the separated numbers you want to set.
15. Enter the numbers you want to set and press the [OK].
16. Confirm the numbers and press the [OK].
If you want to change the numbers for other separated numbers, repeat steps 14 and 15.
17. Press the [OK].

• If you change the settings, the plotter will automatically restart and return to the HOME screen.
• If you do not change any settings, proceed to step 18.
• Press the [MAC ADDR.] button to display the MAC address.

18. Press the [] icon.
It will return to HOME screen.
DHCP setting
DHCP settings depends on the network device configuration and your environment.
For details, see your device’s manual or consult your network administrator.
The default value of DHCP is [OFF].
Although the DHCP depends on the settings of the DHCP server, if the DHCP setting is turned on, the IP address of this plotter may change every time the power is turned on.
Changing the IP address may cause problems such as not being able to receive data from the computer.
In order to avoid such problems, we recommend that you turn off the DHCP settings.
Operation
1. Press the [] icon.
2. Press the [CONFIG].
3. Press the [COMMUNICATION].
4. Press the [WIRED LAN].
5. Press [DHCP] to turn it to [ON].
To cancel, set it to [OFF].
6. Press the [OK].
• If you change the settings, the plotter will automatically restart and return to the HOME screen.
• If you do not change any settings, proceed to step 7.
7. Press the [] icon.
It will return to HOME screen.
9.4 Clearing buffer memory
Erases output data in buffer memory.
Operation
1. Press the [] icon.
2. Press the [CONFIG].
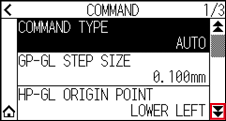
3. Press the [COMMAND].
4. Press the [] icon.
5. Press the [BUFFER CLEAR].
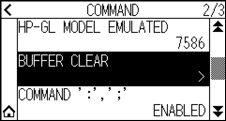
6. Press the [YES, CLEAR].
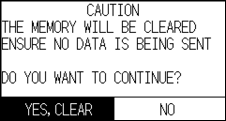
The buffer memory will be cleared and it will return to HOME screen.