Chapter 14: Maintenance
This chapter describes the settings for the maintenance.
14.1 Daily Maintenance
Daily maintenance
During the course of daily plotter operation, be sure to observe the following precautions:
(1) Never lubricate the mechanisms of the plotter.
(2) Clean the plotter's casing using a dry cloth or a cloth that has been moistened in a neutral detergent diluted with water.
Never use thinner, benzene, alcohol, or similar solvents to clean the casings; they will damage the casing's finish.
(3) Clean the cutting mat using a dry cloth. In case of stubborn stains, use a cloth that has been moistened in alcohol or in a neutral detergent diluted with water.
(4) If dust or dirt gets on the sensor that detects the media, it may cause malfunction. Clean the plotter's media sensors using a cloth moistened in a neutral detergent diluted with water.
* Never use thinner, benzene, alcohol, or similar solvents to clean the sensors; cleaners such as these will damage the sensors.
(5) When the Y rail sliding surface gets dirty, gently wipe the dirt away with a clean, dry towel.
* The sliding surface has lubricant on it, so be sure not to wipe all the lubricant off as well.
Storing the plotter
When your plotter is not in use, be sure to observe the following points:
(1) Remove the tool attached to the tool holder.
(2) Cover the plotter with a cloth to protect it from dust and dirt.
(3) Do not store the plotter in direct sunlight or in high temperature and high humidity.
(4) Please lower the set lever so the push roller is in a risen state.
14.2 Replacing Cutter Blade
Replace the cutter blade by referring to the structure diagram of the cutter plunger.

To avoid bodily injury, handle cutter blades with care.
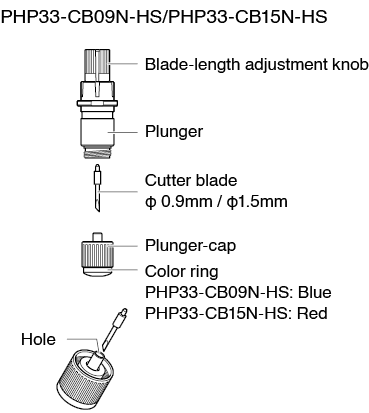
Operation
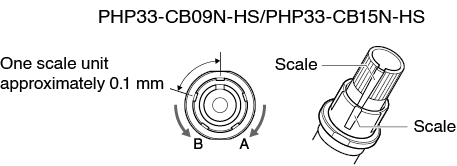
1. Turn the blade-length adjustment knob in the direction of the B arrow and pull the blade into the plunger.
2. Turn the plunger cap in the counter-clockwise direction to remove it from the plunger.
3. Remove the blade from inside the plunger cap.
4. Take a new blade out of its pack. Insert the new blade into the hole provided in the plunger cap.
5. Insert the blade into the plunger cap and attach the plunger from above in that state.
6. Secure the plunger cap by turning it clockwise.
Please fully insert the cutter blade straight into the plunger cap.
If the cutter blade cannot be inserted straight, please insert the cutter blade after pressing the insertion port of the cutter blade several times.
If not installed correctly, it may result in damage to the cutter blade or the plotter itself.

14.3 Cleaning the Cutter Plunger
Letting leftover media and paper dust build up on blades can dull them and cause them to deteriorate. Be sure to clean the cutter plunger regularly and remove build up.
To avoid bodily injury, handle cutter blades with care.
Cleaning
1. Please clean off paper dust and media powder build up from the blade.
After cleaning it, return it to its proper place.
Spin the plunger cap, remove it, and then clean the blade entrance area.

2. After completing cleaning, attach the plunger cap.
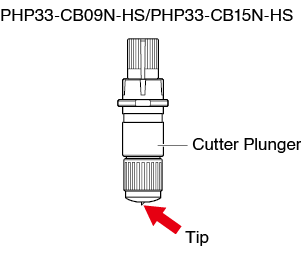
14.4 Cutter Plunger Exchange
The tip of the cutter plunger gets worn down due to friction with the media.
When the tip of the cutter plunger gets worn down, cut quality suffers.
When the tip of the plunger cap gets worn down, it is recommended that you exchange the cutter plunger.
To avoid bodily injury, handle cutter blades with care.
14.5 Setting the Alarm for Blade Wear Alarm
This function allows to measure the cut distance of pen or cutter blade and use it as a guide to determine when the cutter blade should be replaced.
BLADE WEAR DETECT ON/OFF, SET BLADE GROUP, ALARM DISTANCE and BLADE WEAR DETECT settings are required.
Alarm function ON/OFF, group, alarm distance settings
Operation
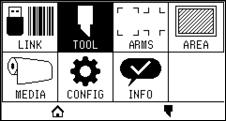
1. Press the [ ] icon.
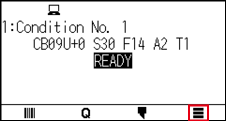
2. Press the [TOOL].
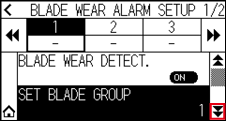
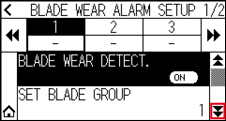
3. Press the [BLADE WEAR ALARM SETUP].
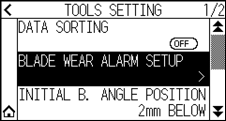
4. Press [BLADE WEAR DETECT.] to turn it to [ON].
To cancel, set it to [OFF].
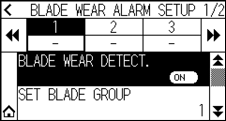
5. Press the [SET BLADE GROUP].
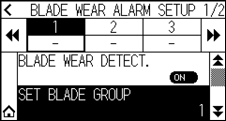
6. Press the group number you want to assign for each tool condition number (1 to 8).
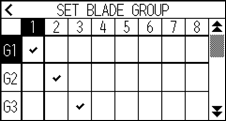

• The horizontal axis represents the tool condition number (1 to 8) to be set. The vertical axis represents the group number.
• [ ] will be displayed at the assigned location.
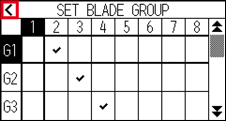
7. Press the [ ] icon.
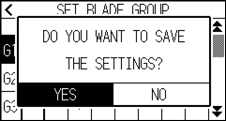
8. Press the [YES].
9. Press the [ ] icon.
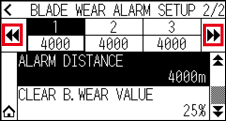
10. Use the [ ] and [
 ] icons to display the group for which you want to set the alarm distance.
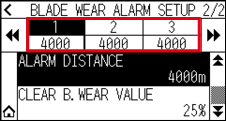
11. Press the group you want to set.
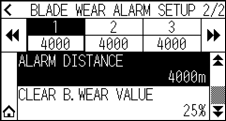
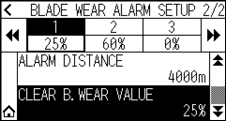
12. Press the [ALARM DISTANCE].
13. Specify the setting value using the [ ] [
] [ ] icon or the [
 ] icon.
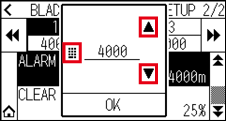
You can set the range between 500 m and 100000 m (100 m step).
14. Confirm the setting and press the [OK].
15. Press the [ ] icon.
 It will return to HOME screen.
Blade wear clear setting
Operation
1. Press the [] icon.
2. Press the [TOOL].
3. Press the [BLADE WEAR ALARM SETUP].
4. Press the [] icon.
5. Use the [] and [] icons to display the group whose blade wear you want to clear.
6. Press the group you want to set.
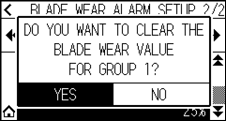
7. Press the [CLEAR B. WEAR VALUE].
8. Press the [YES].
15. Press the [] icon.
It will return to HOME screen.