Chapter 11:
Settings of Controls from Computer
This chapter describes settings regarding the controls from the computer.
11.1 Settings Related to Command Processing
Make settings related to command processing.
Setting the command
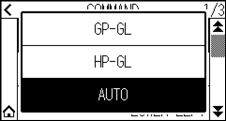
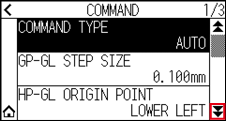
There are 2 types of commands, the GP-GL and the HP-GL, that the plotter can use.
Match the setting to the used software, or set it to AUTO.

• With the AUTO, automatic detection of the command may make mistake depending on the data. It will give error or malfunction when it has made mistake. In that case, set the command before using.
• Always send the data when the plotter is in READY status when the AUTO is set.
• When using data with the AUTO, it will be ready to automatically detect next command 10 seconds after completing the cutting. Send next data after 10 seconds has passed after previous cutting when sending data with different command.
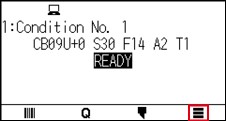
Operation
1. Press the [ ] icon.
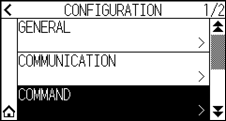
2. Press the [CONFIG].

3. Press the [COMMAND].
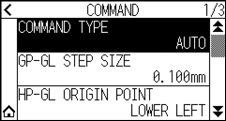
4. Press the [COMMAND TYPE].
5. Press the command you want to use.
6. Press the [ ] icon.
 It will return to HOME screen.
Priority of cut condition selection
Select the priority of the setting created by different method when the tool condition is set.
All the tool condition that is received from the computer will be ignored, and only the setting and change of the tool condition from the control panel is accepted when “MENU PRIORITY” is selected. This setting set here is maintained even if the power is turned off.
On the other hand, it will set the most current tool condition either from the control panel or from the software when “COMMAND PRIORITY” is selected. The values set from the control panel are maintained, and the values set from the software are erased when the power is turned off.
Operation
1. Press the [] icon.
2. Press the [CONFIG].
3. Press the [COMMAND].
4. Press the [ ] icon twice.
5. Press the [CUT CONDITION].
6. Press the setting value you want to use.

7. Press the [] icon.
It will return to HOME screen.
11.2 Related to GP-GL command
This section is useful only when using the GP-GL command.
Setting the GP-GL step size
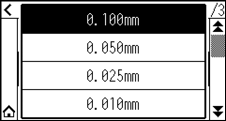
The distance to travel with 1 step can be changed. Match the setting value of the application to be used.
Operation
1. Press the [] icon.
2. Press the [CONFIG].
3. Press the [COMMAND].
4. Press the [GP-GL STEP SIZE].
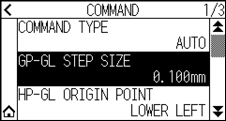
5. Press the setting value you want to use.
6. Press the [] icon.
It will return to HOME screen.
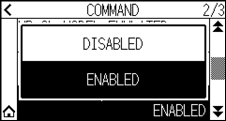
Enabling/Disabling the ' : ' and ' ; ' commands
If the first part of the data is lost when the GP-GL command is set, these commands may be having an adverse effect. In this case, set the ' : ' and ' ; ' commands to DISABLED.
Operation
1. Press the [] icon.
2. Press the [CONFIG].
3. Press the [COMMAND].
4. Press the [] icon.
5. Press the [COMMAND ':',';'].
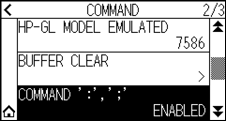
6. Press the setting value you want to use.
7. Press the [] icon.
It will return to HOME screen.
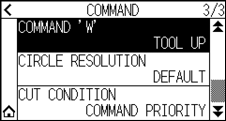
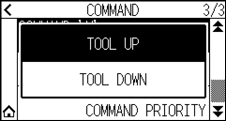
Moving the pen while raised or lowered in Response to the 'W' command
Here, you can change the settings for the 'W' command, which is a GP-GL arc cutting command.
The pen will move to the specified starting position in the raised status when it is set to TOOL UP, regardless of the pen’s conditions.
The pen will move without changing its condition, to the specified starting position in the lowered status when it is set to TOOL DOWN.
This has an effect on the tool cutter only. For the pen setting, always the pen is raised (PEN UP).
Operation
1. Press the [] icon.
2. Press the [CONFIG].
3. Press the [COMMAND].
4. Press the [] icon twice.
5. Press the [COMMAND 'W'].
6. Press the setting value you want to use.
7. Press the [] icon.
It will return to HOME screen.
11.3 Related to HP-GL command
This section is useful only when using the HP-GL command
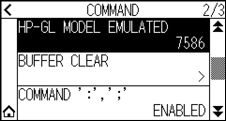
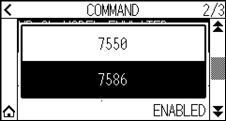
Model ID response
This function set the operation upon receipt of the "OI" command requesting for the model ID.
The reply will be 7550 when set to 7550, and 7586 when set to 7586.
Operation
1. Press the [] icon.
2. Press the [CONFIG].
3. Press the [COMMAND].
4. Press the [] icon.
5. Press the [HP-GL MODEL EMULATED].
6. Press the setting value you want to use.
7. Press the [] icon.
It will return to HOME screen.
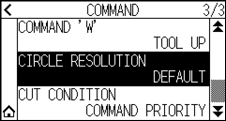
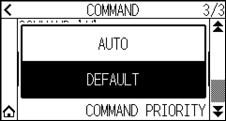
Circle command resolution
This is a function to set the resolution when receiving the HP-GL command arc cutting command for pen plotter.
Select from "AUTO" or "DEFAULT" of 5 degrees.
Operation
1. Press the [] icon.
2. Press the [CONFIG].
3. Press the [COMMAND].
4. Press the [] icon twice.
5. Press the [CIRCLE RESOLUTION].
6. Press the setting value you want to use.
7. Press the [] icon.
It will return to HOME screen.